Factorio server on AWS EC2

Factorio is a video game about building a resource processing pipeline to finally construct a rocket and send it into space.
It might be enjoyable especially for programmers, because they can apply every known anti-pattern (including famous Spring @Autowired) to build complex structures.
You can build factories solo or in cooperative mode that can be hosted by one of the players or using standalone Headless Server. This server application is distributed for free.
For my hobby project i created AWS infrastructure and deployed headless server to EC2, it can be found HERE. It was used in Multiplayer game with 3 players and we managed to launch a rocket without any issues.
In this blog post i describe tools and patterns that i used to deploy Factorio server. Enjoy!
Architecture
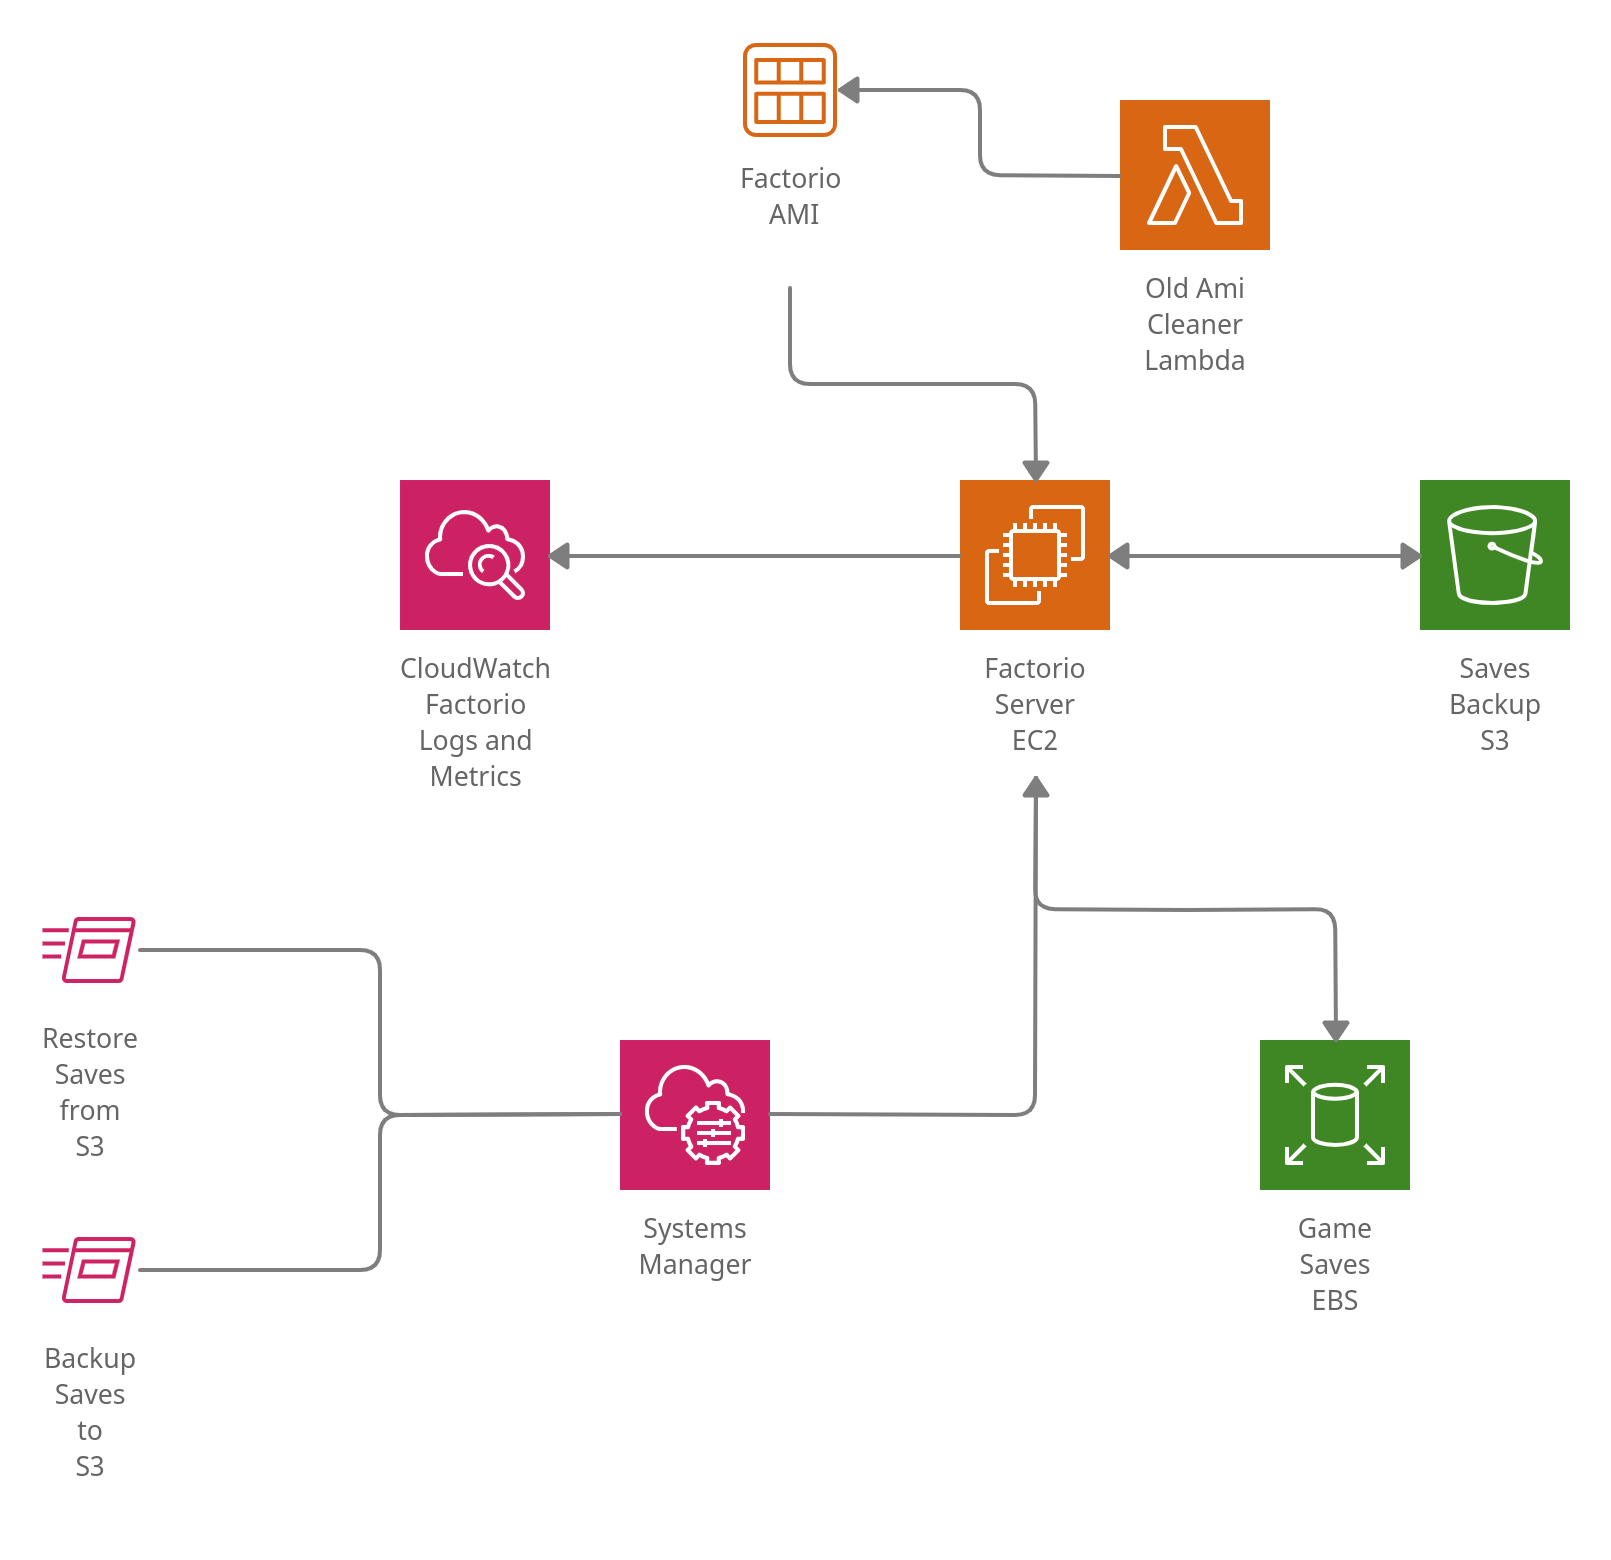
- Factorio Server EC2: game server hosted on EC2, uses custom AMI created with Packer
- Game Saves EBS: Virtual Machines can be terminated and restarted (because of AMI update) so game saves should be stored on EBS volume
- Old Ami Cleaner Lambda: new AMI is created for every new Factorio version, old ones can be removed
- Saves Backup S3: Game saves can be saved and restored on S3. Game saves can be also downloaded from S3 and started locally.
Infrastructure was described using Terraform, AWS CloudFormation was also used to setup Terraform Backend.
Tools
Systemd
Systemd is a service manager that runs as PID 1. It starts user space daemons and manages dependencies and lifecycle, services can be monitored and restarted on failure, they can wait for dependencies and use journal daemon for logging.
Programs can be configured as a units to be managed by systemd. Ini-style files are used to set unit properties. Systemd looks for unit files in many directories, all of them are listed in unit file documentation, i would suggest to use those paths for adding new units:
/etc/systemd/system/usr/lib/systemd/system/usr/local/lib/systemd/system
By using systemd you can run your server application on machine startup, it will also restart the server in case of application failures. Besides that systemd comes with it's own logging system called journal.
Here is a simple example of systemd unit file for Java server application:
[Unit]
Wants=network-online.target
After=network-online.target

[Service]
User=app
Group=app

Type=simple
ExecStart=/usr/bin/java -jar /opt/app/app.jar
Restart=on-failure

[Install]
WantedBy=multi-user.target
Application will be started after network-online.target, it's one of special targets provided by systemd. Unit that has this target defined in Wants and After will be started when the network is properly initialized. You can find more details HERE. Target is a type of unit that is designed for grouping other units into one synchronization point. Units can also depend on other types of systemd entities like devices or services.
Presented unit file describes a service, process controlled by systemd. It contains [Service] section that describes the command that should be used to run the process, it may also contain permission configuration, this process will be run as app user and group. You should always run your services using principle of least privilege.
Type property depends on the way the process initializes itself. It's common in Linux systems that the process is daemonized by calling daemon function or using fork. It's used to detach from controlling terminal and run in the background. For this type of process initialization systemd introduces forking type,
otherwise simple can be used (there are also other types like oneshot or notify, check service documentation for more details).
[Install] section is optional and it's only required if the service should be started during boot process. To do so it needs to be enabled first by typing:
systemctl enable app.service
otherwise [Install] section is skipped. Service can't be started during boot process on it's own, but it needs to be a part of dependency tree, so it needs to be Wanted by other service or target. It's common to use one of systemd special targets, for example multi-user.target. By defining your service as WantedBy=multi-user.target you define it as a part of init procedure for non-graphical system setup.
Service without [Install] section can be started with:
systemctl start app.service
but it won't be started during system startup. It's commond to enable and start service in the same time, to run it now and have it running after restart.
Factorio Service
Factorio service looks similar to one described previously but there are some differences:
[Unit]
Wants=network-online.target
After=network.target network-online.target cloud-final.service

[Service]
User=factorio
Group=factorio

Type=forking
ExecStart=/opt/factorio/factorio_run.sh
ExecStartPre=/opt/factorio/load_settings.sh
PIDFile=/var/lib/factorio/factorio.pid
TimeoutStartSec=20
TimeoutStopSec=20
RestartSec=20
Restart=on-failure
PermissionStartOnly=true

[Install]
WantedBy=cloud-init.target
First different thing is cloud-final.service in After and cloud-init.target in WantedBy.
It's related to how EC2 runs script provided in UserData, by adding these factorio.service will be started when the EC2 initialization is completed, cloud-init is a cloud instance initialization software.
Second thing is Type=forking, it's there because Factorio Server application is started by factorio_run.sh script as follows:
$FACTORIO_BIN --start-server $SERVER_SAVE --server-settings "$SETTINGS_FILE" >> $CMD_OUT 2>&1 & echo $! > $PID_FILE
It contains ampersand so it means, that the server process will be run in background, factorio_run.sh starts the server, saves PID to file and continues initialization.
By defining Type=forking i can be sure, that systemd will manage process spawned by factorio_run.sh not the script itself. PIDFile usage is recommended when Type is forking, it should point to file with process identifier saved.
Those two lines:
ExecStartPre=/opt/factorio/load_settings.sh
PermissionStartOnly=true
Defines script that will be run before the actual process declared in ExecStart, it can be used for initialization. In my case i use it to download server config files from AWS S3 and save them in /etc/factorio directory.
PermissionStartOnly=true allows this init script declared in ExecStartPre to act with root privileges even though the service has restricted permissions to user and group factorio. In newest versions of systemd these lines can be changed to:
ExecStartPre=+/opt/factorio/load_settings.sh
Full syntax spec of this feature is described in systemd service under ExecStart section.
Vagrant
Before uploading scripts to AWS it's worthwhile to test it locally, EC2 instance provisioning takes some time and in case of any error it may be required to terminate the instance and repeat the process. That's why it may be helpful to use virtualization tool called Vagrant to provision similar environment to one that will be created in AWS.
Vagrant is a tool for automating Virtual Machines provisioning. It can be used to create virtual machines for VirtualBox Hyper-V or VMware. It uses Ruby as DSL language, but no Ruby knowledge is required as it's only used to setup some well documented properties.
Vagrant also provides images called boxes with specific operating systems. One of them is amazonlinux-2 with Amazon Linux 2 image, that can be used to work with similar environment that is on EC2 instance, including cloud-init service.
I also recommend Generich Arch Linux image which is frequently updated and can be used to experiment with systemd.
Why not Docker?
Docker is a tool for sandboxing Linux processes, it uses kernel feature called namespaces to separate running process from any other, and overlayfs to create an illusion of having read-write filesystem on top of read-only one called image. The running process in docker environment is managed by host kernel and it's the only process that runs inside the container, so it can't be used to simulate a typical Linux environment with multiple daemons managed by systemd. It's very handful for Kubernetes or AWS ECS deployment or local application testing with database but not for working with systemd.
Vagrantfile
Factorio Vagrantfile is defined as follows:
Vagrant.configure("2") do |config|
    config.vm.box = "bento/amazonlinux-2"
    config.vm.provision "file", source: "factorio.service", destination: "/tmp/factorio.service"
    config.vm.provision "file", source: "factorio_run.sh", destination: "/tmp/factorio_run.sh"
    config.vm.provision "file", source: "backup-on-change.service", destination: "/tmp/backup-on-change.service"
    config.vm.provision "file", source: "backup_save_on_change.sh", destination: "/tmp/backup_save_on_change.sh"
    config.vm.provision "file", source: "vagrant_scripts/load_settings.sh", destination: "/tmp/load_settings.sh"
    config.vm.provision "file", source: "server_config/server-settings.json", destination: "/tmp/server-settings.json"
    config.vm.provision "file", source: "server_config/server-adminlist.json", destination: "/tmp/server-adminlist.json"
    config.vm.provision "file", source: "server_config/map-gen-settings.json", destination: "/tmp/map-gen-settings.json"
    config.vm.provision "file", source: "server_config/map-settings.json", destination: "/tmp/map-settings.json"
    config.vm.provision "shell", path: "vagrant_scripts/init.sh"
    config.vm.provision "shell", path: "vagrant_scripts/backups_retain_config.sh", args: ["5"]
    config.vm.provision "shell", path: "install_extras.sh"
    config.vm.provision "shell", path: "copy_to_priv.sh"
    config.vm.provision "shell", path: "factorio_install.sh", args: [ENV['VERSION']]
    config.vm.provision "shell", path: "vagrant_scripts/make_saves_dir.sh"
    config.vm.network "forwarded_port", guest: 34197, host: 34197, protocol: "udp"
end
It uses file provisioner to copy config files and scripts into guest machine. Notice that every file is copied into /tmp directory, it's because file provisioner doesn't run as root user, so to copy some files into restricted directories like /etc those files first need to be located at some non-restricted location, then copied by script using shell provisioner. It's done using copy_to_priv.sh script.
Next it's initializing the evironment by running scripts with shell provisioner including the on that downloads and install factorio.
Last config line exposes UDP port 34197 to allow connections from host machine to Factorio Server.
Packer
I considered multiple options how to deploy Factorio Server binary to EC2, it can be done during initialization process with UserData, deployed with CodeDeploy from S3 bucket or files provided by CodeBuild, it can also be a part of custom AMI created with Packer.
There is always a trade-off between provisioning time and image management. With UserData or CodeDeploy image management (including removal of old images and creation of new ones when new version of Factorio binary is released) can be omitted, on the other hand it will take longer to startup the instance.
I chose Packer approach but any other seems to be legit. Packer is an automation tool for creating custom AWS images (it works also with other cloud providers), it's declarative and image description looks similar to the one created with Vagrant, but the DSL language is different:
build {
  sources = ["source.amazon-ebs.main"]
  provisioner "shell" {
    script = "install_tools.sh"
    execute_command = "echo 'packer' | sudo -S sh -c '{{ .Vars }} {{ .Path }} ${var.region}'"
  }
  provisioner "file" {
    source = "../factorio.service"
    destination = "/tmp/factorio.service"
  }
(...)
  provisioner "shell" {
    script = "../factorio_install.sh"
    execute_command = "echo 'packer' | sudo -S sh -c '{{ .Vars }} {{ .Path }} ${var.factorio_version}'"
  }
}
Naturally with this approach i have to create a new image for every Factorio update, also old images should be removed to avoid payment for unused snapshots. I remove old images using Old AMI cleaner Lambda that is triggered once per day. It uses BOTO3 to deregister image and remove snapshots.
Terraform
Terraform is industry standard Infrastructure as a Code tool that can manage different cloud providers, including AWS. Amazon provides it's own service called CloudFormation but it's less flexible.
To provision infrastructure for Factorio Server i used Terraform, but also CloudFormation to prepare AWS Backend. Terraform stores state files containing description of all provisioned resources locally
in file terraform.tfstate, without this file it's not possible to update or delete created resources. To use terraform together with CI/CD pipelines remote backend with locking should be used to store state in one place and prevent developers from running multiple infrastructure updates in the same time.
CloudFormation description of Terraform backend is simple:
Resources:
  StateBucket:
    Type: AWS::S3::Bucket
    Properties:
      BucketName: !Sub "factorio-terraform-state-${AWS::Region}-${AWS::AccountId}"
      AccessControl: "AuthenticatedRead"
  LockTable:
    Type: AWS::DynamoDB::Table
    Properties:
      TableName: "factorio-terraform-lock"
      BillingMode: "PAY_PER_REQUEST"
      AttributeDefinitions:
        - AttributeName: "LockID"
          AttributeType: "S"
      KeySchema:
        - AttributeName: "LockID"
          KeyType: "HASH"
Outputs:
  BucketName:
    Value: !Ref StateBucket
It creates S3 bucket to store state files and DynamoDB table for locking.
These resouces can be provisioned by running:
aws cloudformation deploy --template-file infra/terraform_backend.yaml --stack-name "terraform-backend"
It's worthwhile to create such backend even if you don't plan to use terraform in CI/CD environment, because local state file can be removed or lost.
Patterns
EBS Volume attachment
Elastic Block Storage is a service providing access to hard drives that can be attached to EC2 instance. The volume needs to be created first in the same Availability Zone as EC2 instance. Factorio Server uses EBS to store game saves even when the instance needs to be terminated because of new version deployment (every Factorio update requires AMI creation).
EBS volume can be attached to already created EC2 Instance:
resource "aws_volume_attachment" "attach_ebs" {
  device_name = "/dev/sdf"
  instance_id = aws_instance.factorio_server.id
  volume_id = var.saves_volume_id
}
Where /dev/sdf is a path to a device. It needs to be formatted and mounted before it can be used.
factorio_server resource is a dependency of attach_ebs, EBS volume attachment will happen after instance provisioning is finished, this may cause a problem if you try to mount this volume in init script provided using UserData, the volume may not be attached yet, i solved this problem by waiting for the device:
while ! lsblk "/dev/sdf" ; do
  echo "/dev/sdf is not attached yet. Waiting 60 seconds"
  sleep 60
done
Then i format it if it's not formatted yet:
FS_TYPE=$(lsblk -o FSTYPE -n "/dev/sdf")
DEV_NAME=$(lsblk -o NAME -n "/dev/sdf")
DEV_PATH=$(printf "/dev/%s" "$DEV_NAME")

if [ ! "xfs" = "$FS_TYPE" ]; then
  mkfs -t xfs "$DEV_PATH"
fi
And add it to fstab to have it mounted after reboot:
if ! mount | grep "/opt/factorio/saves"; then
  mkdir -p /opt/factorio/saves
  UUID=$(blkid "$DEV_PATH" | grep -oP 'UUID="\K([0-9a-f]{8}-[0-9a-f]{4}-[0-9a-f]{4}-[0-9a-f]{4}-[0-9a-f]{12})')
  FSTAB_LINE=$(printf "UUID=%s  /opt/factorio/saves  xfs  defaults,nofail  0  2" "$UUID")
  echo "$FSTAB_LINE" >> /etc/fstab
  mount -a
  chown -R factorio:factorio /opt/factorio/saves
  chmod -R g+rwx /opt/factorio/saves
fi
Backup on change
Factorio Serves uses only one save file that is modified every server save. It may lead to data loss so i created a simple systemd service using inotifywait command that blocks until some file event happen. After write command done by Factorio Server this service creates a copy of existing save file, it also rotates files to minimize disk usage.
This command can be used like this:
SERVER_SAVE=/opt/factorio/saves/factorio.zip

while ! inotifywait -e close_write $SERVER_SAVE; do
    # perform some actions when the file is closed after WRITE
done
S3 Backup
SSM Agent is installed on EC2 virtual machine to simplify server management. There are two SSM Documents performing RunCommand actions on EC2 machines, one that sends game saves to S3:
schemaVersion: '2.2'
description: Copy Factorio saves to backup bucket
mainSteps:
  - action: aws:runShellScript
    name: CopySaves
    inputs:
      runCommand:
        - for save in /opt/factorio/saves/*.zip; do aws s3 cp "$save" "s3://${bucket_name}/$(basename $save)"; done
        - for save in /opt/factorio/saves/*.zip.backup_*; do aws s3 cp "$save" "s3://${bucket_name}/$(basename $save)"; done
And one that restores saves from S3:
schemaVersion: '2.2'
description: Copy Factorio saves from backup bucket
mainSteps:
  - action: aws:runShellScript
    name: CopySaves
    inputs:
      runCommand:
        - systemctl stop backup-on-change.service
        - systemctl stop factorio.service
        - aws s3 cp s3://${bucket_name} /opt/factorio/saves --recursive
        - systemctl start factorio.service
        - systemctl start backup-on-change.service
${bucket_name} is a parameter that i provide using Terraform, the SSM Document is created as follows:
resource "aws_ssm_document" "saves_backup" {
  name = "factorio_saves_backup"
  document_type = "Command"
  content = templatefile("${path.module}/backup_saves_document.yaml.tmpl", {
    "bucket_name": var.saves_backup_bucket_id
  })
  document_format = "YAML"
}
templatefile is a terraform function that applies parameters to provided template file, so it replaces every occurence of ${bucket_name} with a value of var.saves_backup_bucket_id.
By using these documents it's simple to download multiplayer game and run it locally or start a new game from local file.
Cleaning old AMI
Storing unused AMI may cost additional fee. AMI is a representation of some EBS Snapshot that can be a base for a EC2 Instance. Because of that even it you deregister an image you will still pay for the orphan snapshot.
To avoid such situation i created a AWS Lambda triggered every day by a CloudWatch Event, it uses BOTO3 to describe images first, the response contains a list BlockDeviceMappings, SnapshotId can be fetched from this list. Next the image can be deregistered and after that all fetched snapshots can be deleted.
Conclusions
Server was successfully started and was used to launch a rocket in multiplayer game.
It used t3.medium burstable instance type and with 3 players CPU usage never exceeded 6%. Infrastructure was deployed in Frankfurt (eu-central-1) region that is closest to Poland, no connection problems were observed and everyone reported that the game worked smoothly.
Feel free to use it and enjoy playing Factorio!


